Upcycle Your Scraps!
A while back I learned how to make the most of those leftover pieces of our beautiful, high quality scrapbook papers. It was so much fun that I decided to share it in our Card Club, and then with friends at Open Houses and Workshops! You've got to try it. It's SIMPLE and FUN!

Inspired By Scraps
Card Workshop by Rebecca Laird
1. First cut all of your scraps into strips: either 4.25" or 5.5" depending on their length. Widths can vary between 3/4 inches and 1.5 inches. It's a fun and easy job.
2. Next divide them into color groups. Sort card stock and pattern papers into piles according to their most prominent color: all blues together, all reds together, etc. So beautiful!
3. Now you begin creating! Gather up or create some 4.25" x 5.5" card bases. (These are half of an 8.5 x 11" piece of card stock paper, folded). Begin to group colors in monochromatic or contrasting color groupings, according to what will fit on on each card. Keep the margins between the color strips even. Adhere!

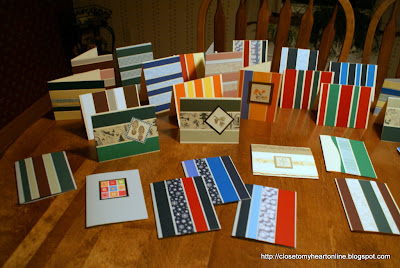
Now you have a fun and enjoyable card, ready to embellish for any occasion. My sister and I enjoyed an evening of crafting these on vacation. We made over 20 cards each!!

Here's how we finished some of ours over the summer.


And the rest were left to finish as an occasion arrived! I used several to make Graduation Cards in just a few minutes on the day of a party. I was able to easily match school colors and personalize this for the special person we were honoring.
Try it!

Inspired By Scraps
Card Workshop by Rebecca Laird
1. First cut all of your scraps into strips: either 4.25" or 5.5" depending on their length. Widths can vary between 3/4 inches and 1.5 inches. It's a fun and easy job.
2. Next divide them into color groups. Sort card stock and pattern papers into piles according to their most prominent color: all blues together, all reds together, etc. So beautiful!
3. Now you begin creating! Gather up or create some 4.25" x 5.5" card bases. (These are half of an 8.5 x 11" piece of card stock paper, folded). Begin to group colors in monochromatic or contrasting color groupings, according to what will fit on on each card. Keep the margins between the color strips even. Adhere!

Now you have a fun and enjoyable card, ready to embellish for any occasion. My sister and I enjoyed an evening of crafting these on vacation. We made over 20 cards each!!

Here's how we finished some of ours over the summer.


And the rest were left to finish as an occasion arrived! I used several to make Graduation Cards in just a few minutes on the day of a party. I was able to easily match school colors and personalize this for the special person we were honoring.
Try it!

Comments
Post a Comment
Thanks for contributing! A moderator will review.